Compreendendo as pistolas pneumáticas de pintura
Pistolas pneumáticas de pintura usam ar comprimido para transformar tinta líquida em uma névoa fina e borrifá-la nas superfícies.
Como funcionam as pistolas de pulverização pneumáticas
Pistolas pneumáticas de pintura são conectadas a um compressor de ar que injeta ar pressurizado na pistola. Ao apertar o gatilho, o ar flui para o bico e se mistura com a tinta.
Essa mistura faz com que a tinta se desfaça em pequenas gotas. Esse processo é chamado de atomização.
O padrão e o tamanho da pulverização dependem da pressão do ar, da ponta do fluido e do design do bico. A maioria dos modelos permite ajustar o padrão para pulverizações horizontais, verticais ou circulares.
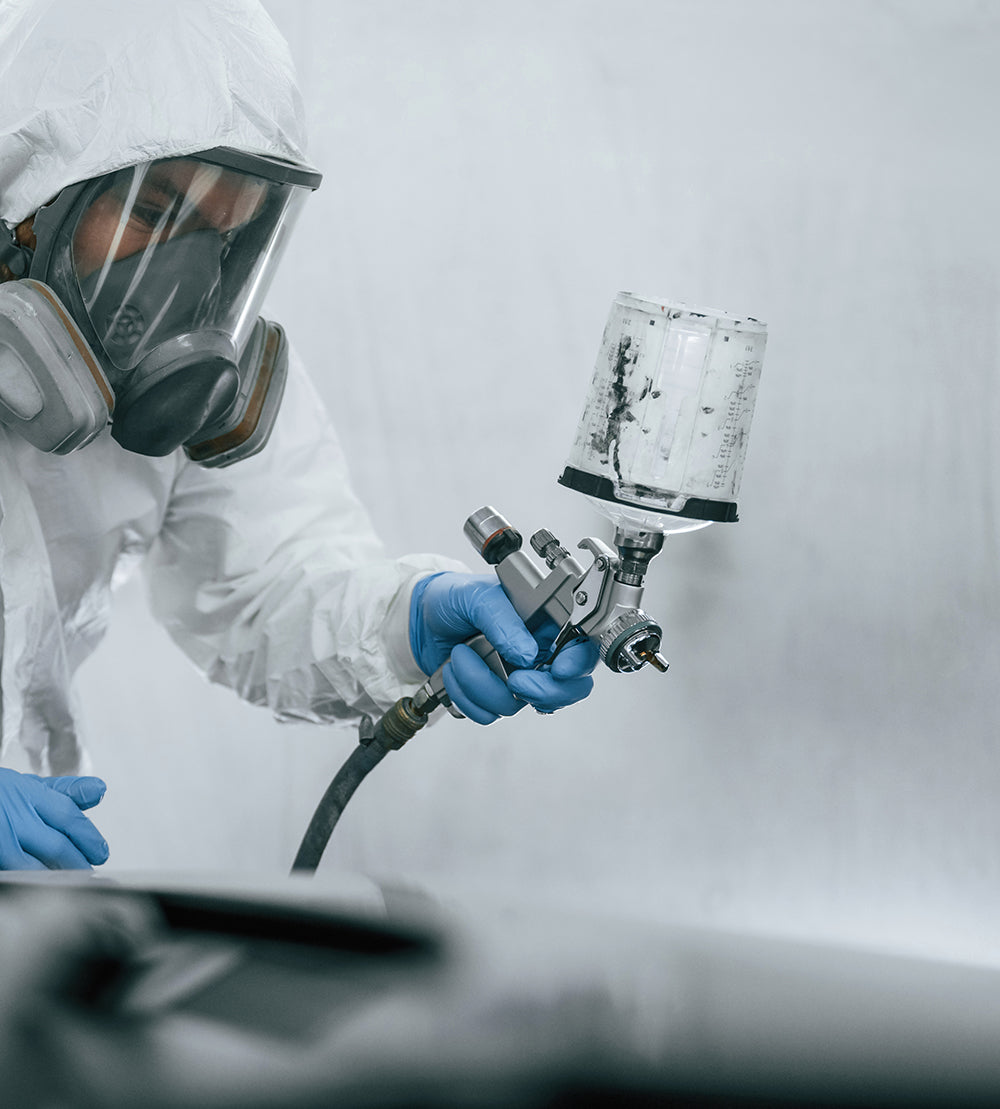
Peças-chave e suas funções
Uma pistola de pulverização pneumática tem várias partes principais:
-
Tampa de ar: Direciona o ar para o fluxo de tinta, moldando o padrão de pulverização.
-
Ponta/bico de fluido: Controla a quantidade de tinta que sai da pistola e sua espessura.
-
Agulha: Bloqueia ou abre a ponta do fluido quando você puxa o gatilho, deixando a tinta fluir.
-
Xícara: Segura a tinta. As pistolas de pulverização por gravidade têm o copo na parte superior, enquanto outros tipos o têm na parte inferior ou lateral.
-
Acionar: Permite controlar o fluxo de ar e tinta ao mesmo tempo.
Tipos de pistolas de pulverização pneumáticas
Você encontrará vários tipos de pistolas pneumáticas de pulverização:
-
Pistola de pulverização HVLP (alto volume e baixa pressão): Utiliza menor pressão de ar e maior volume de ar. É ideal para trabalhos detalhados, pois reduz o excesso de tinta e economiza tinta.
-
Pistola de pulverização convencional (alta pressão): Utiliza maior pressão de ar para atomizar a tinta. Cobre grandes áreas rapidamente, mas gera mais respingos.
-
Pistola de pulverização de alimentação por gravidade: Possui um copo na parte superior para que a gravidade ajude a alimentar a tinta no bico. Funcionam bem para acabamento fino.
-
Pistola de pulverização com alimentação por sifão: O copo fica pendurado para baixo e o ar puxa a tinta para cima. Este tipo é melhor para trabalhos maiores ou materiais mais espessos.
Escolhendo o equipamento certo
Combinando pistolas de pulverização com seus projetos
Para trabalhos pequenos e detalhados, uma pistola de pulverização alimentada por gravidade é ótima porque oferece mais controle e menos desperdício.
Para pintar grandes superfícies, uma pistola de pressão ou sucção cobre uma área maior com mais rapidez. Use pontas menores para tintas finas e trabalhos detalhados; pontas maiores são melhores para revestimentos espessos ou trabalhos grandes.
Verifique sempre se a sua pistola é compatível com o tipo de tinta que pretende usar, como látex, esmalte ou stains. Pistolas manuais permitem controlar cada passada, o que é útil para superfícies difíceis.
Se você estiver pulverizando muitas peças, opções automáticas podem ser mais eficientes.
Selecionando um compressor de ar apropriado
Focar em CFM (pés cúbicos por minuto), que informa a quantidade de ar que sai.
A maioria das pistolas de pulverização precisa de 6 a 12 CFM, mas modelos de alto volume podem precisar de mais. Sempre verifique o que sua pistola exige.
Pressão do ar é medido em PSI (libras por polegada quadrada). A maioria das pistolas de pulverização funciona melhor entre 25 e 40 PSI.
Muita pressão resulta em excesso de tinta. Pouca pressão significa que a tinta não se espalha uniformemente.
O compressor de ar deve ter um reservatório grande o suficiente (pelo menos 70 litros para projetos maiores) para que o fluxo de ar permaneça constante. Se o compressor for muito pequeno, o jato pode falhar ou parar.
Acessórios e ferramentas essenciais
Use um conjunto de escovas de limpeza após cada uso para evitar pontas entupidas e gatilhos pegajosos.
Reguladores e coletores de umidade ajuda a controlar a pressão do ar e mantém a água longe da tinta.
Use mangueiras de ar de qualidade, projetadas para altas classificações de PSI, para evitar vazamentos. Isso ajuda a manter o ar extra pontas de pistola de pulverização e filtros à mão.
Preparando materiais de revestimento
Compreendendo tintas e revestimentos
Tintas e revestimentos vêm em muitos tipos. Os mais comuns incluem tintas látex, acrílicas, à base de óleo e à base de água.
Tintas à base de óleo são mais duráveis, mas precisam de solventes para limpeza. A maioria dos revestimentos é indicada para superfícies específicas, como madeira, metal ou plástico, portanto, certifique-se de verificar.
Leia sempre as recomendações do fabricante. Alguns revestimentos podem precisar ser misturados ou agitados antes do uso para misturar os pigmentos e outros ingredientes uniformemente.
Medição e ajuste de viscosidade
Viscosidade significa quão espessa ou fina é sua tinta ou revestimento.
Tinta muito espessa pode entupir a pistola, enquanto tinta fina pode escorrer e causar cobertura irregular. A viscosidade costuma ser medida com um copo de fluxo.
Encha o recipiente com tinta e cronometre o tempo que leva para ela escorrer. Consulte o manual da pistola ou o rótulo da tinta para saber o tempo recomendado.
Se a tinta estiver muito espessa, dilua-a com o diluente sugerido (como água para revestimentos à base de água ou aguarrás para revestimentos à base de óleo). Misture bem e verifique a viscosidade novamente antes de pulverizar.
Primers e Revestimentos Especiais
Algumas superfícies precisam de tipos específicos de primer. Para metal, use um primer antiferrugem.
Para plástico, escolha um produto próprio para plástico. Para madeira, um primer bloqueador de manchas impede que manchas de nós e seiva transbordem.
Revestimentos especiais, como vernizes transparentes ou acabamentos texturizados, também podem precisar de suas próprias etapas de preparação.
Otimizando o desempenho do aplicativo
Ajustando as configurações de ar e fluido
O ajuste adequado da pressão do ar e do fluxo do fluido é fundamental para uma boa atomização. Comece ajustando a pressão do ar para o ponto mais baixo que ainda proporcione uma pulverização consistente.
Muita pressão causa excesso de tinta e desperdício. Pouca pressão pode causar respingos ou cobertura irregular.
Ajuste o controle de fluido para que a tinta flua suavemente, mas sem escorrer ou pingar. Verifique o padrão de pulverização em um pedaço de material residual.
Eficiência de transferência e controle de excesso de pulverização
A eficiência de transferência indica quanta tinta cai na sua peça de trabalho em vez de ser desperdiçada. Melhorar isso economiza tinta e mantém seu ambiente de trabalho mais limpo.
Use um padrão de pulverização adequado ao tamanho da sua área de trabalho. Se a largura do leque for muito grande, mais tinta errará o alvo.
Segure a pistola de pulverização a cerca de 15 a 20 cm da superfície. Mova-a em velocidade constante e mantenha-a perpendicular à superfície.
Isso reduz o excesso de tinta e permite que mais tinta adira onde precisa. Além disso, evite pulverizar em áreas com vento ou poeira.
Aplique o produto com movimentos suaves e uniformes. Sobreponha cada aplicação em cerca de 50% para obter cobertura total.
Limpe seu equipamento para evitar entupimentos e pulverização irregular.
Conseguindo um Acabamento Fino
Um acabamento perfeito depende de vários fatores: atomização, técnica e condições do equipamento. Certifique-se de que o bico e a agulha estejam limpos, pois qualquer obstrução afeta a qualidade da pulverização.
Escolha o tamanho de ponta certo para o seu material. Tintas mais espessas geralmente requerem pontas maiores, enquanto revestimentos mais finos funcionam melhor com pontas menores.
Aplique a tinta com pinceladas uniformes e sobrepostas para evitar manchas ou riscos. Teste em um pedaço de papel antes de começar a trabalhar na peça.
Deixe cada camada secar conforme recomendado pelo fabricante da tinta antes de aplicar a próxima camada.
Foco em ergonomia e durabilidade
Pistolas de pulverização com design ergonômico
Uma pistola de pulverização ergonômica se encaixa confortavelmente na sua mão e ajuda você a trabalhar por mais tempo sem se sentir cansado. Procure recursos como peso equilibrado, cabo acolchoado e um formato que permita que seus dedos se envolvam facilmente.
Algumas pistolas de pulverização têm um apoio frontal mais estreito ou uma empunhadura especial, facilitando o controle, especialmente durante trabalhos longos. Uma pistola bem projetada também ajuda a reduzir a tensão no pulso.
A posição do gatilho deve permitir que você trabalhe com um ângulo natural do pulso. Os modelos ergonômicos podem incluir empunhaduras texturizadas ou emborrachadas, para que a arma fique estável mesmo se suas mãos suarem.
Pequenos ajustes no design podem fazer uma grande diferença. Se você usa sua pistola de pulverização o dia todo, esses recursos de conforto ajudam a prevenir cãibras nas mãos e fadiga muscular.
Gatilho e conforto do usuário
A força necessária para puxar o gatilho e pulverizar a tinta é chamada de força de gatilho. Uma força de gatilho mais leve reduz a fadiga das mãos e dos dedos, o que é especialmente importante durante projetos grandes ou tarefas repetitivas.
Algumas pistolas pneumáticas mais recentes são projetadas para exigir menos pressão, facilitando a pulverização consistente. Isso não só melhora o conforto, como também ajuda no controle e na precisão da pintura.
Gatilhos ajustáveis permitem que você ajuste o acionamento de acordo com sua preferência. Se o gatilho for muito rígido, sua mão pode se cansar rapidamente, resultando em pulverização inconsistente ou até mesmo cãibras.
Testar diferentes modelos de pistola de pulverização antes de comprar pode ajudar você a encontrar um com o gatilho mais adequado para você.
Perguntas frequentes
Quais são os passos para configurar uma pistola de pulverização com um compressor de ar?
Primeiro, conecte a mangueira de ar do seu compressor à pistola de pulverização. Certifique-se de que as conexões da pistola, da mangueira e do compressor sejam compatíveis.
Ajuste o compressor para a pressão correta recomendada para a sua pistola de pulverização, geralmente entre 20 e 30 PSI para a maioria dos projetos. Verifique e encha o recipiente de tinta da pistola de pulverização.
Ajuste os botões de fluido e padrão conforme necessário. Antes de aplicar o produto, sempre teste em um pedaço de papelão ou material de sucata.
Você poderia fornecer uma tabela de configuração de pistola de pulverização para diferentes aplicações?
| Aplicativo | Pressão (PSI) | Tamanho do bico (mm) | Tipo de tinta |
| Paredes/Interiores | 25-30 | 1,8 - 2.5 | Látex |
| Mobília | 20-25 | 1,3 - 1,8 | Acrílico |
| Carros (camada base) | 20-25 | 1,2 - 1,4 | Automotivo |
| Artesanato | 15-20 | 0,8 - 1,2 | Acrílico |
Quais são as melhores práticas para usar uma pistola de pintura para pintar interiores de casas?
Cubra todos os pisos, móveis e tomadas com lonas e fita crepe. Use máscara por segurança.
Mantenha a pistola em movimento constante e a uma distância de 15 a 30 cm da parede. Sobreponha cada aplicação em cerca de 30% para obter uma camada uniforme.
Trabalhe em pequenas seções. Evite pulverizar muita tinta de uma só vez para evitar respingos ou manchas.
Como usar uma pistola de pintura para obter um acabamento profissional no meu carro?
Limpe e lixe a superfície do carro para deixá-la lisa. Passe um pano para remover poeira e graxa.
Use movimentos lentos e uniformes, sobrepondo ligeiramente cada passada. Segure a pistola a cerca de 15 cm da superfície para melhor controle.
Aplique várias camadas finas em vez de uma camada grossa. Deixe cada camada secar antes de aplicar a próxima.
Quais são as dicas e truques para usar uma pistola de ar comprimido em projetos de artesanato?
Use um bico menor para trabalhos detalhados e com pressão PSI mais baixa, em torno de 15 a 20. Dilua um pouco a tinta para obter um fluxo mais suave.
Pratique em materiais descartados antes de pintar seu projeto. Cubra as áreas que você não quer pintar.
Limpe sua arma logo após o uso para evitar entupimentos. Isso mantém os detalhes nítidos para o seu próximo projeto.
Você pode me orientar sobre como usar corretamente um pulverizador de tinta nas paredes?
Certifique-se de que a parede esteja limpa e seca. Remende quaisquer buracos primeiro.
Use fita crepe para proteger as bordas. Proteja também o teto.
Comece a pulverizar alguns centímetros antes da parede. Mantenha a pistola em movimento para obter uma camada uniforme.
Borrife em linhas retas e sobrepostas.
Deixe cada camada secar conforme as instruções. Adicione uma segunda camada, se necessário, para cobertura total.


Compartilhar:
Prevenção de casca de laranja na pulverização de tinta: dicas fáceis para um acabamento suave
Best paint spray gun? In depth exploration of PRD-815 MP spray gun