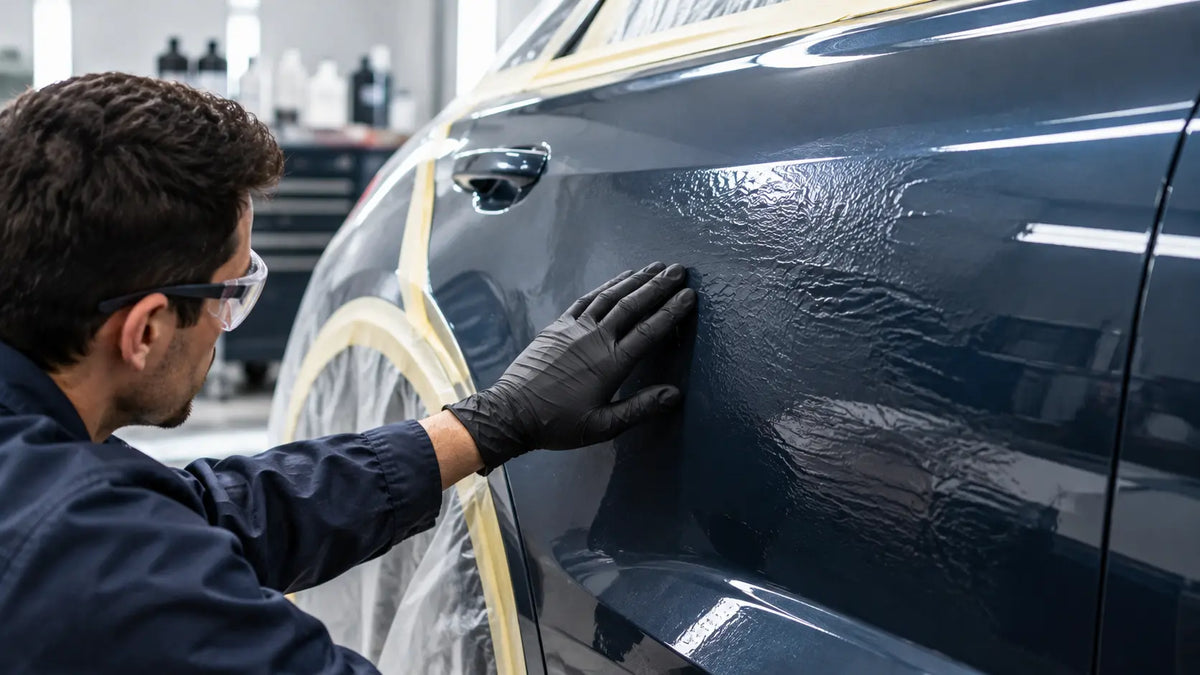
When paint wrinkles after spraying, stop adding material and find which layer has reacted. A new coat can soften a sensitive finish beneath it, particularly at a sanded repair edge. Excessive film build or incorrect timing can make the reaction more severe. Covering the wrinkles before identifying that layer can leave the same weakness under a smoother surface.
The first task is to separate a surface application defect from a coating failure. Then check the product history and the instructions for the next layer.
What the Position of the Wrinkles Can Tell You
|
Where or how the defect appears |
What to investigate |
Next step |
|
Wrinkles follow a feathered repair edge |
Exposed, sensitive older layers |
Inspect the repair boundary and coating history |
|
A broad area reacts under the next coat |
Compatibility, timing or excessive build |
Check all product codes and the application record |
|
The film remains soft or gummy |
Mixing or drying failure |
Confirm components and ratio before planning removal |
|
Rounded craters appear without folds |
A different defect such as contamination |
Diagnose the craters separately |
|
Texture is uneven but the film has not lifted |
Application texture may be involved |
Inspect rather than treating all roughness as wrinkling |
The table narrows the investigation; it does not prove a cause from appearance alone. Record when the defect appeared, what was applied immediately before it and whether the reaction extends beyond the visible edge.
Why New Paint Can Attack an Older Layer
Solvents in fresh material may soften or swell an older coating that lacks resistance to them. A sand-through or feathered edge changes which layer the solvent reaches. A panel can therefore react at the repair boundary while the surrounding intact finish appears sound.
PPG's lifting and wrinkling guidance highlights old non-catalysed finishes, excessive build, reducer selection, sand-throughs and flash timing. Check those details together. Changing the spray gun will not establish that an unidentified old finish is compatible.
The labels 1K and 2K do not settle the question on their own. Some specific 1K primers have approved 2K topcoats; others do not support the proposed sequence. Obtain the compatibility and preparation requirements for the actual products. A small test helps assess a supported process but does not override a prohibited combination.
Should Epoxy Primer Be Fully Cured Before Topcoat
Follow its stated topcoat procedure. Some epoxy primers accept a topcoat within an application window before they reach their final cured properties. Others, or other uses of the same product, require a different drying and preparation route.
Four terms on the technical data sheet describe different points in the job.
|
Term |
Where it occurs |
Why the distinction matters |
|
Induction time |
After mixing and before application, if required |
It is not time counted after spraying |
|
Flash time |
Between specified applications |
It allows the film to reach the next-stage condition |
|
Recoat window |
The permitted timing and preparation for the next material |
A missed window can change the preparation needed |
|
Full cure |
Development of the coating's intended cured properties |
It is not automatically the earliest topcoat time |
For example, the PPG DPLF P-196 sheet, revised October 2024, gives different topcoat times for its two catalysts. At 70°F/21°C, one coat with DP401LF has a 60-minute dry-to-topcoat time; one coat with DP402LF has a 30-minute time. It also specifies a 30-minute induction for DP401LF and no induction for DP402LF.
Those values belong to that product, catalyst, coat count and temperature. The same sheet gives separate instructions after its recoat window has passed. Use the current local sheet for the material on your panel rather than borrowing the shortest number from the example.
How to Fix Paint Wrinkling After Spraying
Let the film reach a workable repair condition
Do not immediately grind into soft paint. It can smear, clog abrasives and make the failure boundary harder to see. Obtain the drying and repair procedure for the affected materials. If the mix is wrong, waiting longer alone may not produce a sound film. Avoid unapproved force-drying.
Remove the affected layers
Determine how far the reaction extends and remove the failed material using the approved method. A topcoat-only defect and a softened primer require different removal depths. Keep checking the boundary for remaining soft islands or lifting edges.
Take care with repair solvents. An aggressive wipe may disturb surrounding layers as well as the wrinkled patch. Use a method that is supported for the substrate and coating stack.
Restore a stable surface
Feather the sound boundary and restore any protection or undercoat required for exposed metal, filler or plastic. The paint prep before basecoat guide covers the general preparation sequence; the selected system determines the primer and sanding requirements.
Use an isolation sealer only when the paint maker permits it over a stable prepared layer. A sealer cannot be assumed to secure a soft or peeling foundation. Confirm compatibility across the complete proposed sequence before mixing another batch.
Test and respray
Use a representative panel with the same preparation, products and coat sequence. Record the ratio, any induction period, flash intervals, temperature and intended topcoat time. Inspect the test at the stages required by the coating process.
Can Light Coats Prevent the Reaction
Avoiding excessive build can reduce one contributor, but a dust coat does not create compatibility. An unnecessarily dry application can introduce roughness or poor colour appearance. Apply the stated coat technique and film build instead of trying to make an unsupported combination work with less paint.
Once the materials and surface are ready, check the fan and working pressure. Our spray gun air pressure regulation guide explains the air-supply check. The PRD-815 has 1.2 and 1.3 mm nozzle options to compare with the chosen basecoat or clearcoat. Verify the actual setup on a test pattern before the repair.
Use the controls and protective equipment for every component. If the later spray stage includes isocyanate-containing clearcoat, review the 2K clear coat safety guide and the coating's safety data sheet before starting.
Frequently Asked Questions
Why does paint wrinkle over primer that feels dry
Touch-dry condition does not establish solvent resistance or permission to topcoat. Check the primer's mix, build, temperature and recoat instructions, together with the layers underneath it.
Can I sand the wrinkles flat and clear over them
Only a sound prepared film should remain under new material. Flattening the surface may leave softened or poorly bonded layers beneath it. Establish the failure depth before deciding the repair.
Is an overnight wait always enough for epoxy primer
No. Timing depends on the exact product, hardener, film build and conditions. Overnight may also place a coating beyond a particular application window. Follow the actual topcoat and re-preparation instructions.
Does a successful test prove the whole old finish is safe
A test provides evidence for the area and process tested. It cannot establish that unidentified layers across the entire vehicle are the same or overr
Compartilhar:
Gold Metallic Paint Mottling on a Hood and How to Fix It
How Wet Should Base Coat Be Before Clearcoat