Introduction
For most first-time DIY car painters, there are two nightmares:
Spray too much, and you get runs.
Spray too little, and you get orange peel.
Recently, a beginner posted on Reddit after painting his car with a budget Harbor Freight spray gun. His primer and clear coat looked decent, but the final finish ended up covered in orange peel texture.
His question was simple:
"Was it the cheap spray gun? Wrong air pressure? Spraying too far away? Or was I just too afraid of getting runs?"
The discussion that followed attracted professional painters with decades of experience, and the answers reveal an important truth:
Orange peel isn't usually caused by one mistake. It's often the result of several small factors working together.
The good news?
Orange peel is one of the most common paint defects—and one of the easiest to fix.For model-specific performance, setup, and application context, see our orange peel prevention tips.
What Causes Orange Peel?
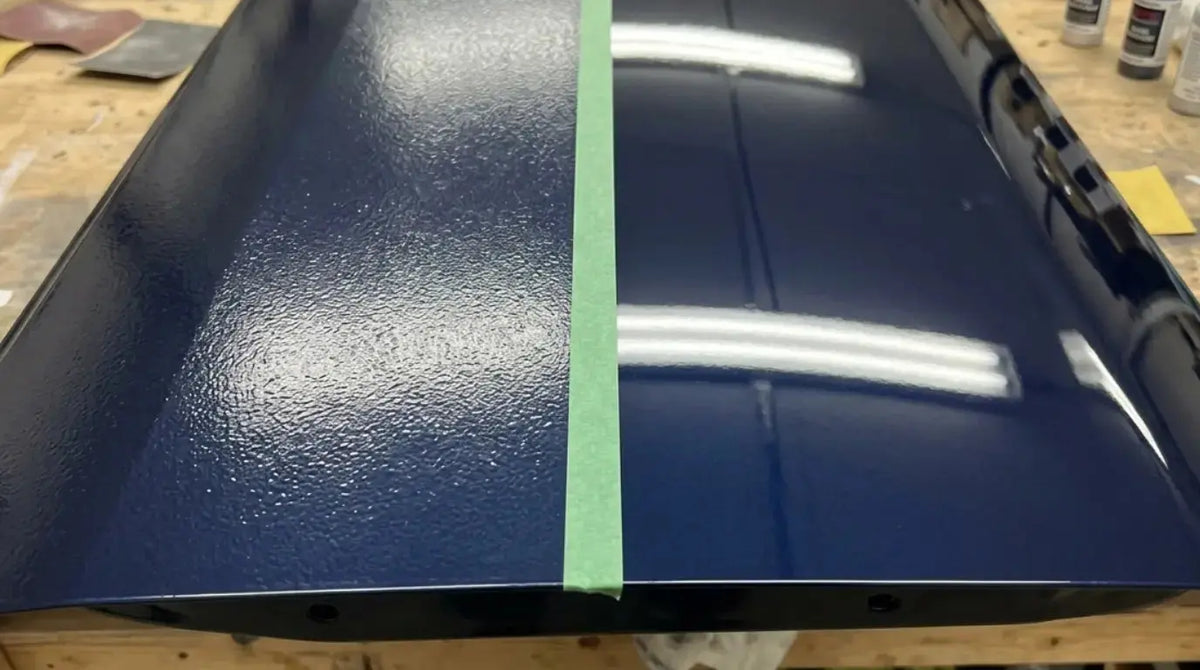
Orange peel happens when paint lands on the surface but doesn't have enough time or material flow to level itself before drying.
Instead of becoming a smooth sheet, the paint freezes in place with a textured appearance resembling an orange peel.
Here are the most common causes.
1. Fear of Runs (The Most Common Beginner Mistake)
Many experienced painters in the discussion agreed on one thing:
Beginners are usually too cautious.
Nobody wants to create runs in fresh paint, so new painters often spray dry coats instead of wet coats.
The result?
The clear coat lands on the panel as tiny droplets rather than flowing together into a smooth film.
A properly applied wet coat should look glossy and wet immediately after spraying.
2. Insufficient Atomization
Atomization refers to how finely the spray gun breaks paint into droplets.
If air pressure is too low:
- Paint droplets become larger
- The coating becomes uneven
- The surface struggles to level out
This issue is especially noticeable when spraying clear coat through a 1.3mm or 1.4mm nozzle.
A poorly atomized clear coat often creates instant orange peel.
3. Spraying Too Far Away or Moving Too Fast
Many DIY painters hold the gun too far from the panel.
When that happens:
- Paint partially dries in the air
- Less material reaches the surface
- The finish becomes rough and textured
A common recommendation is maintaining approximately:
- 6–8 inches (15–20 cm) from the surface
- Consistent overlap between passes
- Steady movement speed
If you're moving too fast, the panel simply doesn't receive enough material to flow together.
4. Fast Reducers and Hot Conditions
Temperature matters more than many beginners realize.
When weather is:
- Hot
- Dry
- Windy
Paint solvents evaporate faster.
If you're also using a fast reducer or activator, the coating may begin curing before it has a chance to level itself.
The result is often severe orange peel despite proper technique.
5. Air Supply Problems
Many painters blame the spray gun when the real issue is the compressor.
Common air supply problems include:
- Low compressor CFM
- Pressure drop during spraying
- Moisture contamination
- Oil contamination
Even a high-end spray gun cannot produce excellent results if the air system cannot keep up.
Before upgrading your gun, verify that your air supply is delivering clean, consistent pressure.
Can a Cheap Spray Gun Produce Professional Results?
This was one of the most debated topics in the Reddit discussion.
The Case for Premium Spray Guns
Professional spray guns from brands like:
- SATA
- Anest Iwata
offer:
- Superior atomization
- Better fan consistency
- Higher transfer efficiency
- Greater forgiveness for beginners
Many professionals describe premium guns as tools that "help the painter."
The Truth About Budget Spray Guns
The surprising consensus?
Cheap spray guns absolutely can produce show-quality finishes.
Thousands of YouTube videos prove it every year.
However, budget guns typically require:
- More testing
- More adjustments
- Better technique
- More patience
A cheap spray gun won't automatically create orange peel.
It simply gives you less margin for error.
How to Improve Results with an Affordable Spray Gun
Before spraying your vehicle, spend time dialing in the setup.
Increase Air Pressure Slightly
Many painters find better atomization by running clear coat around:
- 30–35 PSI (at the gun)
Always follow paint manufacturer recommendations first.
Fully Open the Fluid Control
Test on masking paper or cardboard.
Look for:
- Even distribution
- Full fan pattern
- No heavy center spots
- No dry edges
Perform Spray-Out Tests
Never make your first pass on the vehicle.
Spend five minutes testing first.
It can save hours of sanding later.
Recommended Spray Gun for Beginners
For those looking for a reliable beginner-friendly option, consider the PORPHIS PRD-717 Spray Gun.
- VS Atomization Type
- 1.3/1.4mm Nozzle
- Required CFM: 15.2
- Pressure: 18–26 PSI
- Suitable for large and medium panels (full car / door panels)
- Compatible with both water-based and solvent-based clear coats
This model balances affordability and professional-level results, making it ideal for new DIY painters who want to minimize orange peel issues.
The Professional Painter's "Pyramid Method"
One veteran painter shared a process that many beginners overlook.
Think of paintwork as a pyramid.
If the foundation isn't smooth, the final finish won't be smooth either.
Step 1: Perfect the Base Coat
After the base coat dries:
- Lightly remove dust nibs
- Correct minor texture
- Keep the surface clean
A smoother base allows the clear coat to flow more evenly.
Step 2: Apply a Tack Coat
The first clear coat pass should not be your wettest coat.
Instead:
- Apply a light tack coat
- Create a uniform sticky surface
- Allow proper flash time
This gives the next coat something to grab onto.
Step 3: Apply a Proper Wet Coat
This is where many beginners hesitate.
Watch the surface directly behind the spray pattern.
You should see the clear coat:
- Appear wet
- Flow together
- Build gloss immediately
The finish will continue leveling as it flashes.For model-specific performance, setup, and application context, see our fixing HVLP finish inconsistency.
A wet coat should look wet.
Already Have Orange Peel? Here's How to Fix It
The best news from the entire discussion:
Orange peel usually does not require repainting.
In most cases, it can be corrected after curing.
Method 1: Wet Sand and Buff
This is the standard professional approach.
Step 1
Allow the clear coat to fully cure.
Depending on the product, this may take several days.
Step 2
Wet sand using:
- 1500 grit
- 2000 grit
Use a sanding block whenever possible.
The goal is to remove texture peaks—not cut through the clear coat.
Step 3
Refine with:
- 2500 grit
- 3000 grit
Step 4
Machine polish using:
- Cutting compound
- Finishing polish
Done correctly, the result can rival factory paint.
Method 2: The "Painter's Trick" (Advanced Users Only)
One experienced painter mentioned a technique involving blending solvent.
The idea is to apply a highly reduced clear mixture that temporarily softens the textured surface and encourages additional flow-out.
While effective in skilled hands, this method carries risk and is generally not recommended for beginners.
If you're new to painting, wet sanding and polishing remains the safest solution.
Orange Peel vs Runs: Which Is Worse?
For beginners, the answer is simple:
| Defect | Easier to Fix? |
|---|---|
| Orange Peel | ✅ Yes |
| Runs | ⚠ Depends |
| Severe Runs | ❌ Often More Work |
Many professional painters would rather deal with mild orange peel than heavy runs.
That's because orange peel can usually be corrected through sanding and polishing.
Final Thoughts
Every experienced painter has sprayed orange peel at some point.
The difference between beginners and professionals isn't perfection.
It's understanding why defects happen and knowing how to correct them.
If you're struggling with orange peel, focus on these fundamentals:For model-specific performance, setup, and application context, see our zero-orange-peel show-car finish.
✔ Proper atomization
✔ Correct spray distance
✔ Consistent gun speed
✔ Adequate air supply
✔ Confidence when applying wet coats
And remember:
A cheap spray gun doesn't automatically create a bad finish. A well-adjusted gun in skilled hands can produce results that look surprisingly professional.
The more panels you paint, the more your eyes learn what a proper wet coat should look like—and that's when orange peel starts disappearing.
Share:
Professional Standardized Guide: Professional Spot Repair and Clear Coat Blending
How to Paint Your Own Car at Home: A Complete DIY Guide for a Smooth Factory-Like Finish