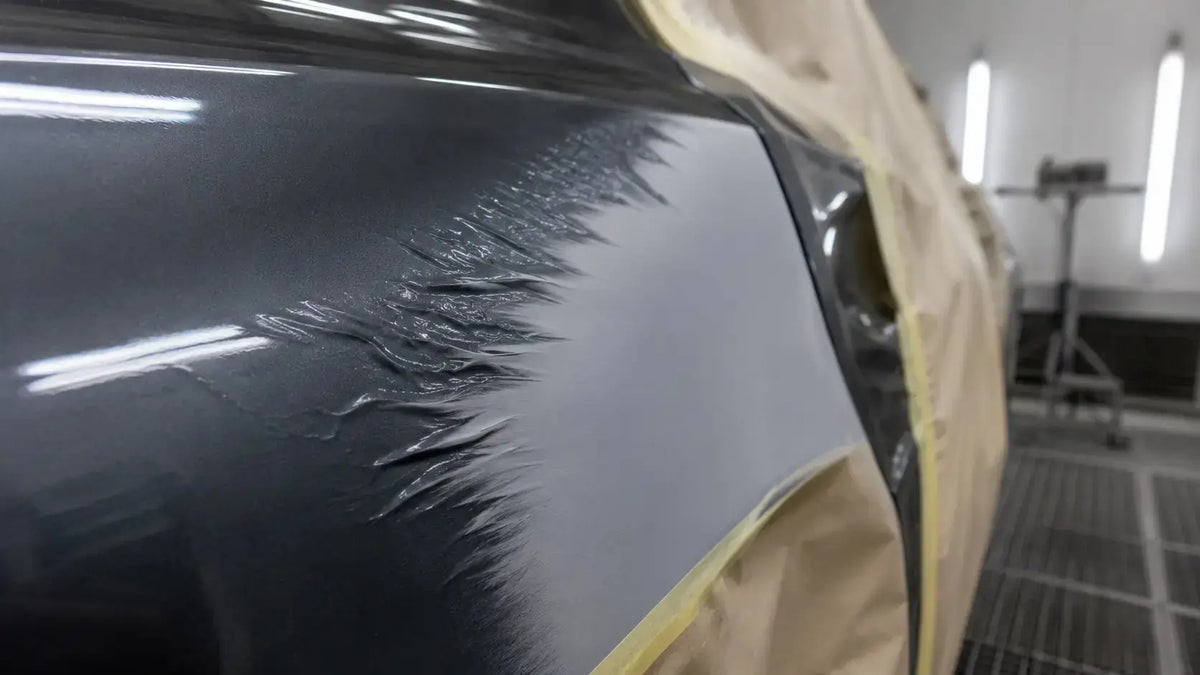
You sand the repair, feather the primer edge, spray the basecoat—and a few minutes later the edge starts to wrinkle. So you sand it again, reprime it, change the gun settings, and the same reaction comes back.
That pattern is a clue. When the wrinkle follows the edge of the old repair, the spray gun is usually not the root cause. You are more likely looking at lifting: fresh solvent is attacking a layer underneath that is not stable enough to accept the new coating.
Quick Diagnosis
|
What you see |
More likely cause |
First move |
|
Wrinkles follow the exact primer/old-paint edge |
Solvent-sensitive or unstable underlying coating |
Stop spraying and identify which layer is reacting. |
|
Reaction appears after a heavy wet coat |
Solvent attack / excessive wet film |
Do not bury it with more basecoat; allow the area to stabilize. |
|
Problem returns after repriming |
Old substrate or repair edge may still be the weak layer |
Remove failed material farther back and rebuild the repair system. |
|
Wrinkle appears across the whole primed area |
Primer cure, compatibility, film build or recoat-window issue |
Check the primer TDS and the full coating sequence. |
What “Lifting” Actually Means
Axalta’s paint-defect guidance describes lifting as a condition where solvents in a new topcoat attack an older surface and distort or wrinkle it. That is a better way to think about this defect than simply calling it “bad primer.”
The weak layer may be the primer, but it can also be an older repair, a solvent-sensitive 1K coating, an edge that was not feathered far enough, or a coating that was recoated outside its approved window.
Why Feather Edges Are So Sensitive
A feather edge is not one uniform material. In a small area you can have cured OEM paint, an older refinish layer, exposed primer, filler edge and fresh primer. Each layer may react to solvent differently.
That is why the problem often traces the perimeter of the repair. The new basecoat is not creating the weak layer—it is revealing it.
The Most Common Causes
1. Solvent Attack on an Old or Sensitive Finish
A fresh basecoat or reducer can soften an older coating that does not have enough solvent resistance. The wetter the new coat, the more aggressive that solvent exposure can become.For model-specific performance, setup, and application context, see our paint prep before base coat.
2. Primer Recoated Before the System Allows It
A 2K primer is not automatically safe to topcoat the moment it feels dry. Cure time and recoat window depend on the exact primer, activator, reducer, film build and temperature. Follow the TDS, not a generic clock.
3. Too Much Material, Too Quickly
Heavy coats and short flash times increase solvent load at the repair edge. If something underneath is marginal, this can trigger lifting faster.
4. An Incomplete Feather Edge
A visible or tactile ridge, coarse scratch, unsanded edge or contaminated transition can create a weak repair boundary. Final abrasive choice depends on the paint system; 3M uses P320 in one feather-edge refinement SOP, but that is not a universal number for every coating.
5. Incompatible Layers
Mixing unknown old coatings, primers, sealers, reducers and basecoat systems increases uncertainty. If the history of the panel is unknown, treat the repair as a compatibility problem until proven otherwise.
Should You Use a Sealer?
Sometimes—but not as a shortcut.
A compatible sealer can help create a more uniform surface and isolate a properly prepared repair when the coating system calls for it. What it cannot do is make soft, wrinkled or actively reacting paint healthy again.For the related preparation and adhesion steps, use our guide to paint adhesion failure on plastic parts.
If the underlying film has already lifted, remove the failed material first. Then rebuild the repair according to the primer, sealer and basecoat manufacturer’s instructions.
What About a Light Mist Coat?
A very light test application can help reveal whether a questionable edge is still reactive, but it should not be treated as a repair method. Trying to “lock down” a solvent-sensitive substrate with dry coats can hide the problem long enough to waste more material.
If the test area wrinkles again, stop. The correct fix is below the basecoat. For model-specific performance, setup, and application context, see our repairing paint delamination on a hood.
How to Repair Basecoat Wrinkling
- Stop spraying as soon as the reaction appears.
- Let the area stabilize according to the coating manufacturer’s guidance. Do not aggressively sand a film that is still soft or chemically active.
- Remove the wrinkled coating and continue until you reach a stable layer. If the edge keeps reacting, widen the repair rather than repeatedly coating the same weak boundary.
- Identify what is underneath: OEM finish, older refinish, 1K material, primer, filler or unknown coating.
- Rebuild the primer system using compatible products and the stated flash/cure/recoat windows.
- Use a compatible sealer only when the system calls for it or the substrate needs uniform isolation.
- Spray a small test area before committing to the full panel.
Pre-Spray Checklist
|
Check |
What “good” looks like |
|
Feather edge |
No hard ridge; transition is smooth and refined to the abrasive range required by the coating system. |
|
Primer cure |
Inside the manufacturer’s approved cure/recoat window. |
|
Compatibility |
Primer, sealer, basecoat, reducer and existing finish are known to be compatible. |
|
Film build |
No heavy wet buildup used to hide the repair. |
|
Flash time |
Each coat allowed to flash as specified. |
|
Test area |
No lifting or wrinkling before the full panel is committed. |
Where the Spray Gun Fits In
Once the substrate is stable, the gun matters again. A predictable spray pattern and controlled material delivery help you avoid unnecessarily flooding a sensitive repair edge.
The PORPHIS PRD-817 uses a 1.3 mm setup and is published at 1.3–1.8 bar with 15.2 CFM air consumption. It can be part of a controlled automotive topcoat setup when the coating manufacturer supports the nozzle and your air system can maintain the required flow.
But it is worth repeating: changing from one spray gun to another will not stop lifting caused by an unstable layer underneath.
A Simple Diagnostic Flow
- Wrinkle appears → stop spraying.
- Does it trace the old repair edge? → suspect solvent-sensitive / unstable substrate.
- Was primer recoated inside its TDS window? → if no, correct cure/recoat process
- Are coating layers known and compatible? → if uncertain, remove farther back and rebuild.
- Is the surface stable after a small test? → only then proceed with controlled basecoat application.
Final Takeaway
Basecoat wrinkling at a feather edge is usually a substrate and chemistry problem, not a gun-setting problem. Stop adding paint, remove the failed material, identify the unstable layer, and rebuild with compatible products inside the coating system’s cure and recoat requirements. Use a sealer only when the system calls for it. Solve the substrate first, then tune the gun. Safety: follow each product’s SDS/TDS, PPE and ventilation requirements.
Share:
How to Clear Coat Carbon Fiber Parts Safely: Prep, 2K Safety, and Spray Technique
Woodworking Spray Setup Upgrade: Compressor, Air Quality and Spray Gun Choices That Actually Matter