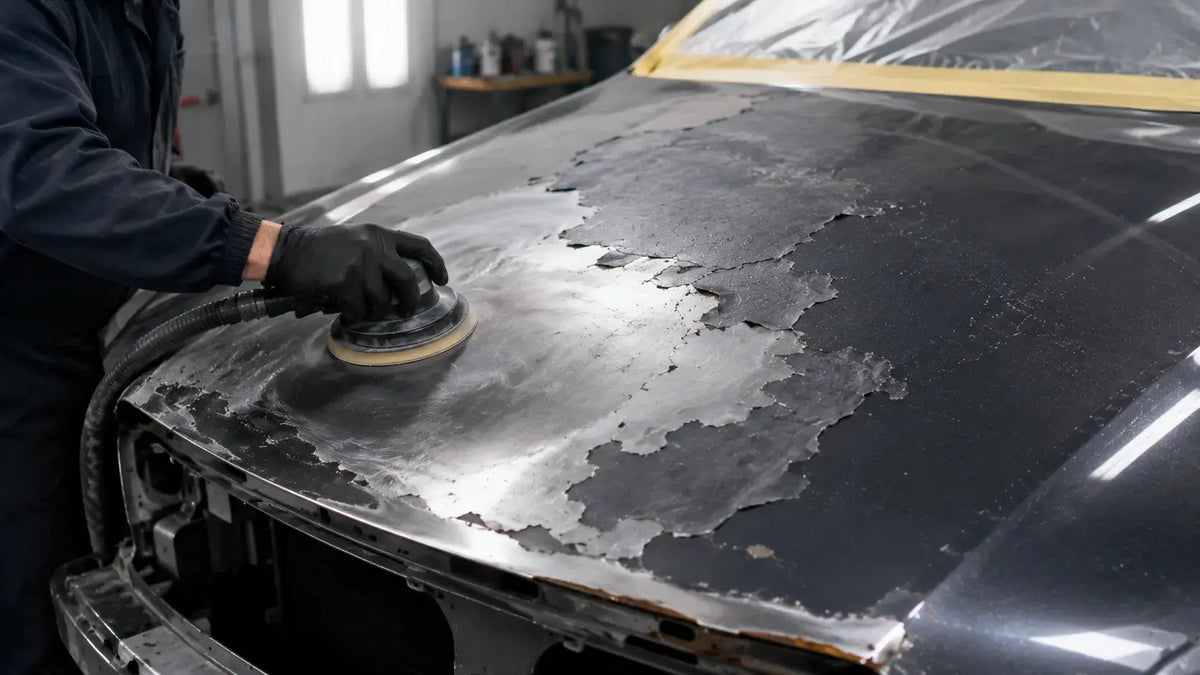
When paint starts peeling off a hood in big sheets, I would not treat it as a simple touch-up job.
A small chip or a little clear coat failure is one thing.For the related preparation and adhesion steps, use our guide to paint adhesion failure on plastic parts. But when the paint is lifting, curling at the edges, or exposing primer and bare metal, the problem is usually deeper. One of the layers underneath has lost adhesion, and the loose area you see may only be the beginning.
That is why sanding the obvious damaged spot and spraying new paint over it often does not last. The repair may look fine for a while, but if the surrounding coating is weak, the same peeling can come back.
Before deciding whether to repair one section or strip the whole hood, the first step is to check how stable the remaining paint really is.
What Paint Delamination Actually Means
Paint delamination means one coating layer has separated from another. It can happen between the clear coat and base coat, between the base coat and primer, or between primer and bare metal. On an older hood or a previously repaired hood, the failure may also sit somewhere inside the old repair layers.
You may see peeling paint, raised edges, bubbling, exposed primer, or paint that keeps lifting while you sand. That last sign is important. If the paint continues to lift once sanding starts, the problem is not limited to the visible edge.
This is different from simple fading or light clear coat wear. Delamination usually means the paint system underneath is unstable. A new coat of paint will only last if the weak material is removed or the repair is built on a solid foundation.
Why Hoods Delaminate More Often
A hood looks like a simple panel, but it has a hard life. It sits above engine heat, gets direct sunlight, and takes the first hit from stones, sand, water, road film, and temperature changes.
If the hood has been repainted before, the risk is even higher. A previous repair may have looked fine for years, but poor sanding, contamination, skipped primer, or incompatible materials can eventually show up as peeling.
The most common causes include:
- poor sanding or weak surface preparation before the previous paint job
- wax, grease, silicone, or dust left on the panel
- primer that was skipped, applied incorrectly, or not allowed to flash properly
- moisture trapped under the coating
- painting over old unstable material
- incompatible primer, base coat, or clear coat products For model-specific performance, setup, and application context, see our diagnosing paint peeling after clear coat
- long-term heat and UV exposure
In many cases, the peeling area you can see is only the part that has already failed. The surrounding paint may still be attached, but not strongly enough to trust for a long-term repair.
Inspect the Whole Hood Before You Decide
Do not decide the repair method only by looking at the largest peeling spot. Check the whole hood first.
A practical inspection should include
- lightly sanding around the damaged edge to see if the paint keeps lifting
- checking for bubbles or raised areas away from the main failure
- looking for exposed primer, bare metal, or rust
- checking nearby edges, seams, and stone-chip areas
- paying attention to old repair lines or uneven film build
If the edge feathers cleanly and the surrounding paint stays solid, a local repair may be possible. If the paint keeps breaking away or the hood has several weak areas, a full strip is usually the safer route.
Should You Strip the Whole Hood to Bare Metal?
This is the main question: should you strip the whole hood to bare metal, or just sand the damaged area?
The answer depends on how much of the existing finish you can trust.
A local repair may be enough when:
- the peeling is limited to one small area
- the surrounding paint is firmly bonded
- sanding does not make the edge keep lifting
- there is no rust under the failed coating
- the original coating system appears stable
In that situation, you may be able to feather the edge, prime the repair area, blend the base coat, and clear the panel. It still needs careful prep, but the whole hood may not need to be stripped.
Strip the whole hood when:
- paint is peeling in several areas
- large sections have already lifted
- the edge keeps spreading during sanding
- bare metal or rust is exposed in multiple spots
- the hood has unknown previous repairs
- the remaining paint feels brittle, thick, or unstable
Stripping takes more time, but it removes the weak layers instead of hiding them. For a large hood failure, that extra work often saves you from doing the same repair twice.
Basic Repair Process for Large Hood Delamination
The exact process depends on the paint system and the condition of the hood. But for most large delamination repairs, the workflow looks like this.
1. Remove Every Loose or Failed Layer
Start by removing paint that is lifting, cracked, or poorly bonded. Do not leave a loose edge because it looks small. Once primer, base coat, or clear coat is applied over that edge, the failure can continue underneath the new finish.
If the failure is widespread, strip the hood completely. A clean foundation is more important than saving a little sanding time.
2. Feather the Edges
If you are doing a local repair, feather the edge gradually so there is no hard step between the repair and the existing finish.For model-specific performance, setup, and application context, see our basecoat wrinkling at a feather edge. Hoods are flat and easy to read under light, so a sharp edge or sanding step can show through later.
Work through the grits carefully and keep the transition smooth.
3. Protect Bare Metal
If bare steel is exposed, do not leave it unprotected. Clean the surface, remove any corrosion, and apply the correct primer system. In many refinishing jobs, epoxy primer is used over bare metal because it provides strong adhesion and corrosion protection.
Skipping this step is one of the fastest ways to make the repair fail again.
4. Build the Surface with Primer Surfacer
After the bare metal is protected, primer surfacer can be used to level the repair area. Once it has cured, sand it smooth and check the panel shape under proper lighting.
A hood is large and flat. Small waves, sanding marks, or hard repair edges can become obvious after clear coat.
5. Apply Base Coat Evenly
This is where spray gun control starts to matter.
A hood is a large panel, so the base coat needs to be applied evenly from one side to the other. Uneven passes can cause patchiness, poor metallic orientation, or visible blending issues.
A quality base coat spray gun helps maintain a stable fan pattern and consistent material distribution, especially when spraying metallic or pearl colors.
Keep your overlap consistent and follow the recommended flash times between coats.
6. Apply Clear Coat with a Controlled Wet Edge
Clear coat is where many hood repairs succeed or fail.
A hood looks easy until you spray one. It is wide, flat, and it shows every dry pass, heavy edge, and uneven overlap. Too dry, and the finish can look rough or dull. Too heavy, and you risk runs, solvent issues, or excessive orange peel.
For large panels, use a paint spray gun for cars that can maintain stable atomization and a consistent fan pattern. This makes it easier to keep the wet edge moving across the hood without dry spots or uneven gloss.
Most clear coat systems are applied in two medium-wet coats, but always follow the product technical data sheet.
7. Inspect After Curing
Once the clear has cured, inspect the hood under good lighting.
Look for:
- orange peel
- dry spray
- dust nibs
- uneven gloss
- color inconsistency
- edge mapping
- sanding marks
Minor surface imperfections can often be corrected with wet sanding and polishing after the clear has fully cured.
Common Mistakes That Make Delamination Come Back
The biggest mistake is trying to save time by painting over unstable paint.
Other common problems include:
- not cleaning the panel properly
- skipping primer on bare metal
- using incompatible paint products
- ignoring flash times
- spraying heavy coats too quickly
- rushing the curing process
- using poor spray equipment on a large panel
A good finish depends more on preparation than on the final coat of paint. If the base is weak, even the best clear coat will not save it.
Spray Gun Choice Matters More on a Full Hood
A hood looks simple until you start spraying it.
It is wide, flat, and every pass is visible. If the gun sprays unevenly, the clear can look dry on one side and too heavy on the other. That is when you start seeing orange peel, uneven gloss, or inconsistent flow across the panel.
For a small spot repair, you may get away with basic equipment. But for a complete hood refinish, the spray gun needs to hold a stable fan pattern and lay down material evenly from one pass to the next.
A professional automotive spray gun does not replace proper sanding, primer, flash times, or technique. But once the surface is ready, better atomization and fan control make the application more predictable.
Recommended Spray Gun for Hood Refinishing
For this kind of job, I would not choose a small spot-repair gun or an unstable budget gun. A full hood needs a gun that can keep the pattern even from one pass to the next.
That is where the PORPHIS PRD-817 VS Spray Gun fits this type of repair. Its 1.3 mm setup is suitable for automotive clear coat work, and the stable atomization helps when spraying larger panels like hoods, doors, and roofs.
The PRD-817 will not fix poor prep. No spray gun can do that. But when the panel has been prepared correctly, a more stable gun gives the painter better control over coverage, gloss, and finish consistency.
Recommended Product: PORPHIS PRD-817 VS Spray Gun
 |
 |
Frequently Asked Questions
How do you fix large delamination on a hood?
Remove all loose or unstable paint first. If the failure is widespread, strip the hood completely. Then repair bare metal, apply the correct primer system, spray the base coat evenly, and finish with clear coat.
Should I strip the whole hood to bare metal or just sand the damaged area?
If the peeling is small and the surrounding paint is solid, a local repair may work. But if the paint keeps lifting while sanding, or if several areas are failing, stripping the whole hood is usually the safer repair.
What causes paint to delaminate from metal on a hood?
Common causes include poor surface preparation, contamination, incorrect primer, trapped moisture, incompatible materials, UV exposure, engine heat, and poor previous repairs.
Can I paint over delaminated paint?
No. If the paint is already lifting, new paint will not fix the bond underneath. It may cover the problem for a short time, but the weak layer can continue to peel later.
Can clear coat fix delamination?
No. Clear coat may hide the problem for a short time, but it cannot restore adhesion between failed layers. The loose coating has to be removed before refinishing.
What spray gun should I use for repainting a hood?
Use a professional automotive spray gun with stable atomization and an even fan pattern. For large panels like hoods, a reliable base coat spray gun and clear coat gun help produce smoother, more consistent results.
Final Thoughts
Large paint delamination on a hood is not something you should simply cover with more paint.For the related preparation and adhesion steps, use our guide to fixing paint cracking after a repaint.
If the coating has lost adhesion, the repair needs to start by removing the unstable layers and rebuilding the surface properly. That may mean a local repair in minor cases, but for widespread peeling, stripping the hood is often the more reliable option.
Once the surface is clean, primed, and ready, spray technique and equipment become very important. A stable automotive spray gun helps apply base coat and clear coat more evenly, especially across a large panel like a hood.
For complete hood refinishing, the PORPHIS PRD-817 VS Spray Gun is a practical choice for painters who want fine atomization, better control, and a smoother clear coat finish.
Share:
Clear Coat Over Bare Metal: Why It's a Bad Idea and What to Do Instead
Metal Flake Paint Guide: Mixing Flakes, Choosing Tip Size, and Avoiding Clogs